


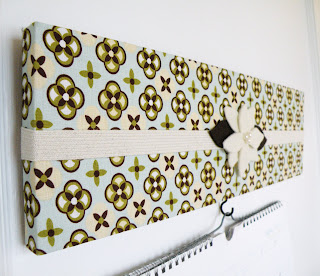
 My message board design evolved from the shape and size of salvaged wood I retrieved from a local cabinet maker. I often get long narrow pieces and wanted to come up with something that would hold a calendar and this was it. The elastic band was added for the purpose of holding messages, invitations, and appointment cards.
 And now you can make your own with this nifty tutorial. 


 This picture made me do a head tilt...something about the angle of the picture of items. Anyways here is your supply list. Oh, and I have to apologize for my winter stricken hands, these photos were taken during the winter months--add genetics, frequent hand washing, dry air, and below zero temperatures and you get hands like mine. I would never make it as a hand model that's for sure.
SUPPLIES
~ wood
(you can use any size that will work with your calendar, mine is 15"w x 4"h)
~ fabric
~ staple gun
~ felt
~ nail
~ glue gun(not pictured)
~ cup hook 1/4"
~ elastic (I use cotton elastic)
~ sawtooth hangers
~ rotary cutter
~ mat
~ quilt ruler
~ pencil
~ decorative embellishment (optional)
 This is my decorative embellishment to be added to the front of the elastic band. I made my own flower pattern and cut it from felt and added little pearls for the center, cuteness.
{1}
 On one side of your wood piece find the center and mark with a pencil--this will be the bottom of your message board. * You can also mark the back of your wood so you remember which end is the bottom it can come in handy when you add your embellishment to the front.
{2}
 Place your nail on your pencil mark and hammer the nail in about 1/4", this hole will be used to screw your cup hook in. *If you are using a really hard wood you may need to drill a pilot hole instead.
{3}
 Cut your fabric piece to be approximately 2" larger then your board on all FOUR sides. *This will make your fabric four inches wider and taller. Place your wood centered on your fabric piece. If you are using a repeat patterned fabric like mine, you will want to line your wood evenly with your pattern.
{4}
 Pull your fabric over your wood firmly on the center of one side and staple, repeat this to each side.
  The center of all four sides stapled should look like the above picture.
 Continue to staple around each side--making sure to pull the fabric tightly while stapling so the fabric is nice and snug to the wood. *You can alternate your sides to keep your pattern even. Your staples should be relatively close together. Once you have stapled along each side you will have little flaps of fabric on each corner.
{6}
 Taking care of the corners. Pinch the corner fabric together.
 With you corner piece pinched, pull the piece tightly over the top and to the back and staple 2-3 times. It will create a little triangle as shown in the picture above.
 Once all four corners are stapled, cut the excess fabric to reduce bulk on the back.
 All cut.
 Add your elastic band by placing it on the back centered and staple multiple times. Pull your elastic band around the front tightly and staple to the opposite side.

 I did not add pen holders to the tutorial message board but they can easily be added after your band is added. Simply cut two elastic piece about 2" long and create a little loop and staple the ends multiple times to the back of your wood. I generally place them about 3-4" from the side. *See the above picture for an example, you can even sew little buttons to the loops if you want.
 With a rotary cutter, ruler and mat cut a felt piece approximately 1/4" smaller than the size of your wood on all FOUR sides. *Your piece will be a 1/2" smaller than the width of your board and 1/2" smaller than the height of your board.
 Using your glue gun run a small bead along the top of your felt and glue to your on all four sides.

 Add your sawtooth hangers to the back.
{13}
 Add your embellishment with needle and thread.
 Cut your fabric piece to be approximately 2" larger then your board on all FOUR sides. *This will make your fabric four inches wider and taller. Place your wood centered on your fabric piece. If you are using a repeat patterned fabric like mine, you will want to line your wood evenly with your pattern.
{4}
 Pull your fabric over your wood firmly on the center of one side and staple, repeat this to each side. The center of all four sides stapled should look like the above picture.
 {5}
Continue to staple around each side--making sure to pull the fabric tightly while stapling so the fabric is nice and snug to the wood. *You can alternate your sides to keep your pattern even. Your staples should be relatively close together. Once you have stapled along each side you will have little flaps of fabric on each corner.{6}
 Taking care of the corners. Pinch the corner fabric together.
{7}
With you corner piece pinched, pull the piece tightly over the top and to the back and staple 2-3 times. It will create a little triangle as shown in the picture above.{8}
Once all four corners are stapled, cut the excess fabric to reduce bulk on the back. All cut.{9}
Add your elastic band by placing it on the back centered and staple multiple times. Pull your elastic band around the front tightly and staple to the opposite side.Band added.
{9 1/2}
I did not add pen holders to the tutorial message board but they can easily be added after your band is added. Simply cut two elastic piece about 2" long and create a little loop and staple the ends multiple times to the back of your wood. I generally place them about 3-4" from the side. *See the above picture for an example, you can even sew little buttons to the loops if you want.{10}
With a rotary cutter, ruler and mat cut a felt piece approximately 1/4" smaller than the size of your wood on all FOUR sides. *Your piece will be a 1/2" smaller than the width of your board and 1/2" smaller than the height of your board. {11}
Using your glue gun run a small bead along the top of your felt and glue to your on all four sides. {12}
 Add your sawtooth hangers to the back.
 {13}
Add your embellishment with needle and thread.{14}

Remember that hole you made with your nail, using the same nail find the hole and puncture the fabric.
{15}


Screw your cup hook into the hole previously made.
{16}
Find a really great place to hang your new message board.
*If anyone has any questions, feel free to leave me a comment.
Happy Crafting!


2 comments:
Very wonderful tutorial! Thanks for sharing, can't wait to try it out!
Cheers,
Julie
Lovely and simple, erica, very good job! I love the fabrics you choose, I definitely want to make it!! Only hope to find time to do all the cute things I find...
Thanks for sharing,
Alessia
Post a Comment